AAPG Tutorials
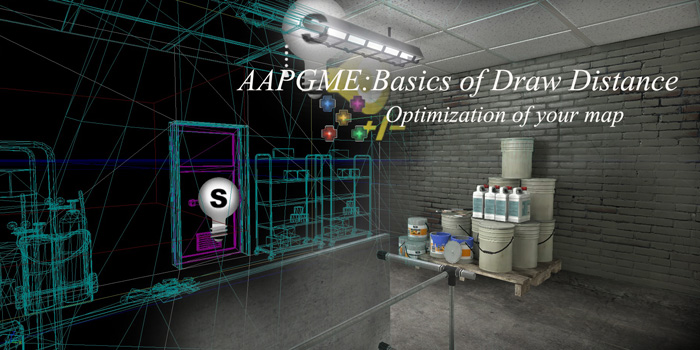
AAPG Basics of draw Distance
AAPG Importing sounds tutorial "basic version"
AAPG Vertex Painting
AAPG Cover Links
AAPG World info
AAPG Applying Custom Material Instance Constants
AAPG Basic Movement Tracks
AAPG How to publish your map "basic version"
AAPG Importing sounds tutorial "basic version"
AAPG Vertex Painting
AAPG Cover Links
AAPG World info
AAPG Applying Custom Material Instance Constants
AAPG Basic Movement Tracks
AAPG How to publish your map "basic version"
AAPG Basics of draw distance
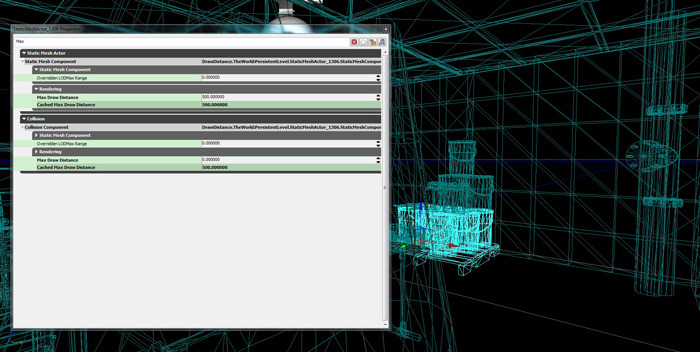
Max Draw Distance
Lets say your just about to publish your map but your getting lag spikes..
You scratch your head and say whats causing this..
Its most likely when a player is viewing the map from certain places especially from one end to the other of the map he is unknowingly rendering everything within the environ.That's a huge performance issue.
So how do we fix this..
Max Draw Distance
Each asset has this value in its properties..
In my example room.. your game engine still renders all the assets inside this room even though your outside and can not see them.
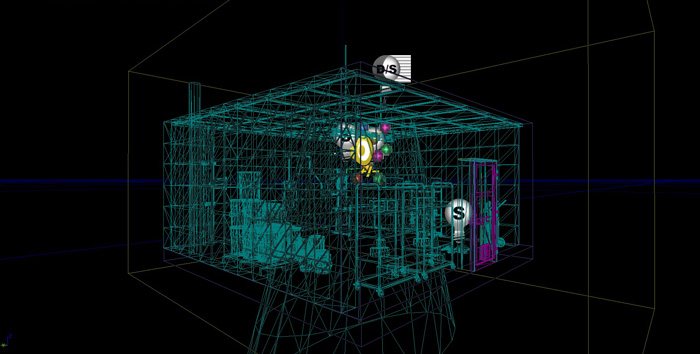
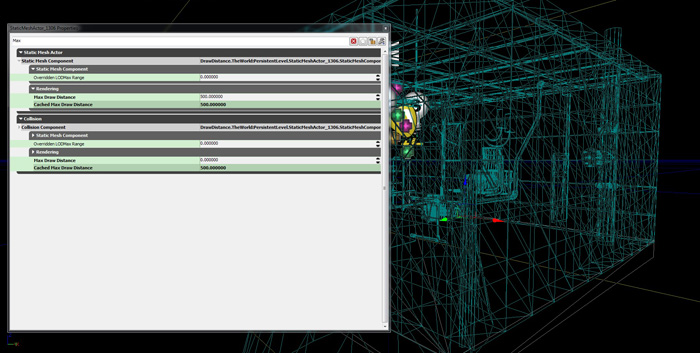
So to fix this we need select a assets press F4 and in search filter Type Max..
In the Rendering section you will see
Max Draw Distance,the default is set to zero..
So if I zoom in and out in wire frame mode none of my assets disappear..
But if i set the value of a assets Max Draw Distance to say 500.."perfect for this room" and zoom out the assets disappears and now is not being rendered..Perfect.
Max Draw Distance,the default is set to zero..
So if I zoom in and out in wire frame mode none of my assets disappear..
But if i set the value of a assets Max Draw Distance to say 500.."perfect for this room" and zoom out the assets disappears and now is not being rendered..Perfect.
So now I must select all the other assets in the room and set the MaxDrawDistance on all to a value of 500..
But keep in mind the doorway..Imagine if the door was open and your standing outside and can see into the room, if your at a distance greater than 500 all the assets wont be rendered until you walk forward so keep this in mind when setting your Max Draw Distance on assets in your map..
So keep this in mind when optimizing your map..
I hope this simple tut helps solve any performance issues you have..
AAPG Importing sounds tutorial "basic version"
Before we start you can either download the sounds you want for your level from any good free sound websites or import your very own recorded sounds.
NOTE when downloading sounds from websites make sure they are 16 bit wav files..Any sample rate is fine but the recommended sample rates of 44100 or 22050 are best.
Also take note what license is connected to the sound your downloading.
The below text is from SoundBible
Royalty Free Sounds
Royalty Free Sounds are sounds that are free from royalties. They can be used commercially in things like movies, games, and anything else you might need a cool sound for. You may not however redistribute them for a profit. While sending one to a friend is ok, selling one to a customer is not.
Creative Commons Attribution 3.0
Creative Commons Attribution 3.0 is one of many CC Audio types. Creative Commons Attribution 3.0 put simply means you can use this audio but you must attribute your work to this person. If the audio is from Mike Koenig then you need to give him credit somewhere. That somewhere could be in the credits, the cd cover, or a link to the sounds page from your site.
Public Domain Sounds
Public Domain Sounds are sounds that have been added to the public domain. They are owned by the public, and are 100% free. Items get added to the PD in a variety of different ways.
1.) Items older than the public domain age setting are automatically added.
2.) Thoughtful members of the audio community donate their own works for the good of others. 3.) Speeches by presidents and other political audio is usually considered public domain works.
Ok now that's done..
Lets get started
This is a basic tutorial on SoundNode waves.
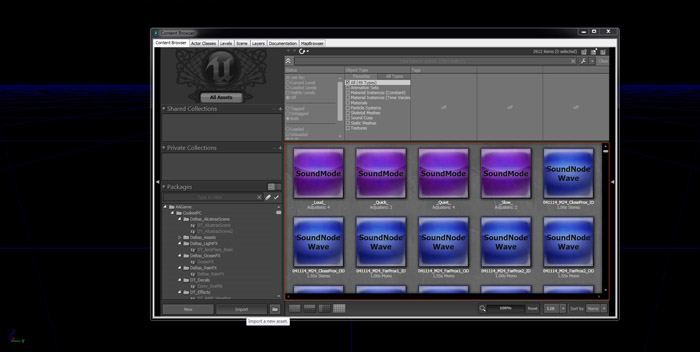
After you have downloaded your sounds lets get them into AAPGME..
In the content browser bottom left is Import click on this.
NOTE when downloading sounds from websites make sure they are 16 bit wav files..Any sample rate is fine but the recommended sample rates of 44100 or 22050 are best.
Also take note what license is connected to the sound your downloading.
The below text is from SoundBible
Royalty Free Sounds
Royalty Free Sounds are sounds that are free from royalties. They can be used commercially in things like movies, games, and anything else you might need a cool sound for. You may not however redistribute them for a profit. While sending one to a friend is ok, selling one to a customer is not.
Creative Commons Attribution 3.0
Creative Commons Attribution 3.0 is one of many CC Audio types. Creative Commons Attribution 3.0 put simply means you can use this audio but you must attribute your work to this person. If the audio is from Mike Koenig then you need to give him credit somewhere. That somewhere could be in the credits, the cd cover, or a link to the sounds page from your site.
Public Domain Sounds
Public Domain Sounds are sounds that have been added to the public domain. They are owned by the public, and are 100% free. Items get added to the PD in a variety of different ways.
1.) Items older than the public domain age setting are automatically added.
2.) Thoughtful members of the audio community donate their own works for the good of others. 3.) Speeches by presidents and other political audio is usually considered public domain works.
Ok now that's done..
Lets get started
This is a basic tutorial on SoundNode waves.
After you have downloaded your sounds lets get them into AAPGME..
In the content browser bottom left is Import click on this.
Now search for the folder that has your sound wav files,select the files and click open.
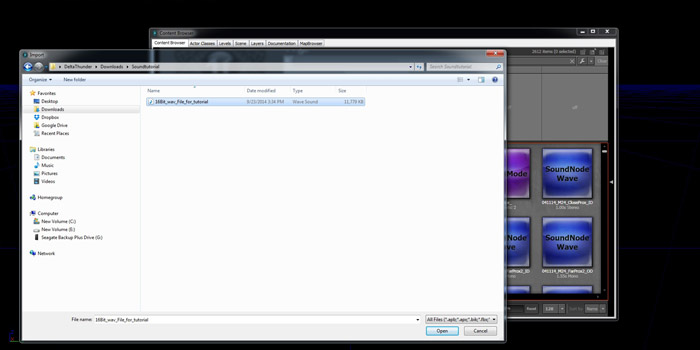
A Import window will appear in AAPG ,this is your package Info.
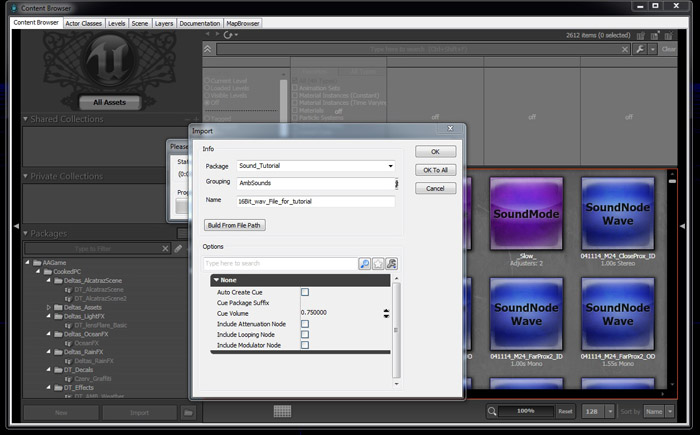
s Package Put the name of your package.For this example I used Sound_Tutorial
Grouping. Since its a Ambient sound I'm importing I called this group AmbSounds
Name this is the name you choose for your particular sound..I called this one Wav_file_for_tutorial..
Now in the option section you have a few different options..I generally check the Sound Cue box.
Grouping. Since its a Ambient sound I'm importing I called this group AmbSounds
Name this is the name you choose for your particular sound..I called this one Wav_file_for_tutorial..
Now in the option section you have a few different options..I generally check the Sound Cue box.

This will now import a Sound Cue as well as the Wave Sound Node
once done click OK..
Your sounds are now imported into AAPGME
once done click OK..
Your sounds are now imported into AAPGME
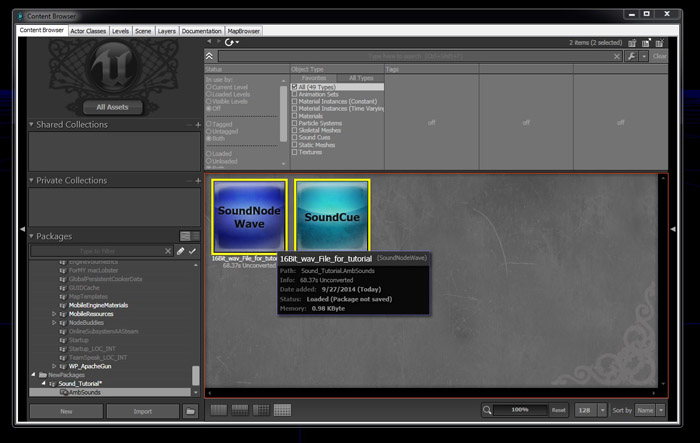
Now save your package.
Now lets place one of these nodes into your map..
Select the Sound Node Wave. Then right click on your map where you basically want this sound node placed,you will see a few different options for the type of sound node you want to place
Now lets place one of these nodes into your map..
Select the Sound Node Wave. Then right click on your map where you basically want this sound node placed,you will see a few different options for the type of sound node you want to place
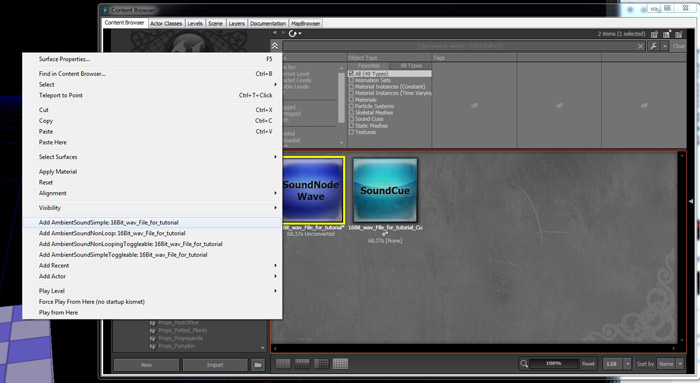
For this tutorial I used Add Ambient Sound Simple..Once its added you can now press F4 to open that sound actors properties and change these options to what you need..
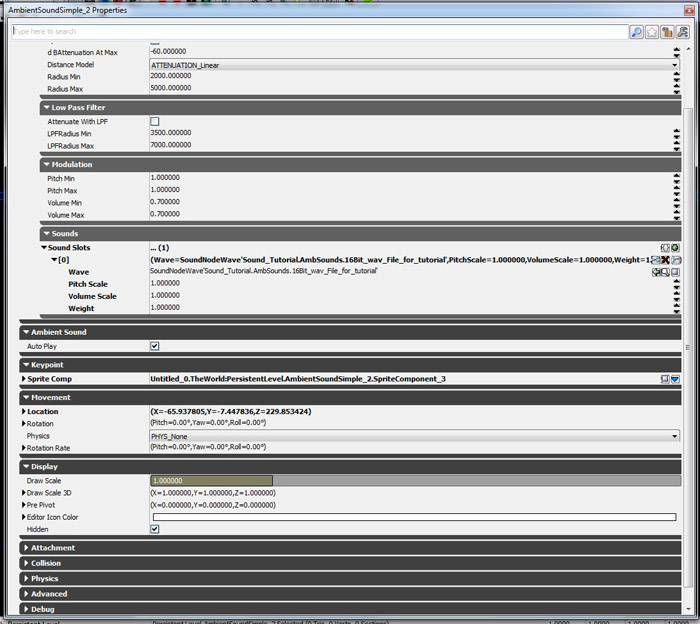
Make the appropriate adjustments to your sound actor and your set to go..
This tutorial could go for ages so to shorten it up just watch these vids..
These will help you understand all you need to know about sound and importing them into AAPGME.
I hope this simple Tutorial helped..
Links...
GuildHall Sound Tutorial https://www.youtube.com/watch?v=Cp9RnmD5im8
3DBuzz https://www.youtube.com/watch?v=it1-dUIRbuc
UDK Epic Games http://udn.epicgames.com/Three/AudioHome.html
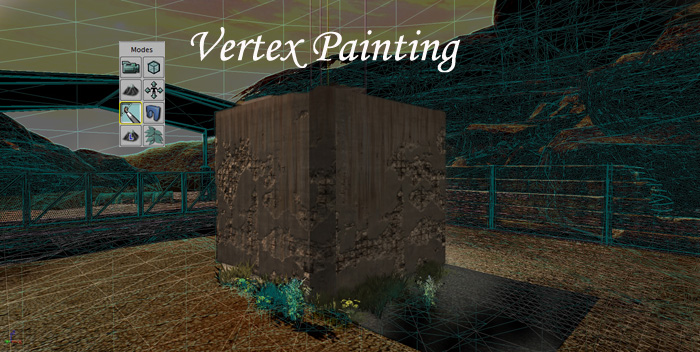
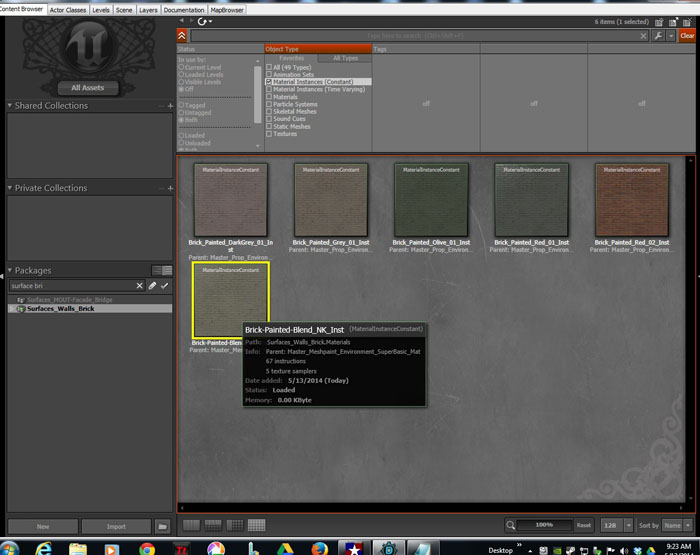
AAPG Vertex Painting
For this tutorial I used Wall Assets located in the package named
ModKit_Walls_03
The materials used are from package Surface_Walls_brick."MaterialInstanceConstants"
Make sure you fully load each of these packages.
Lets get started...
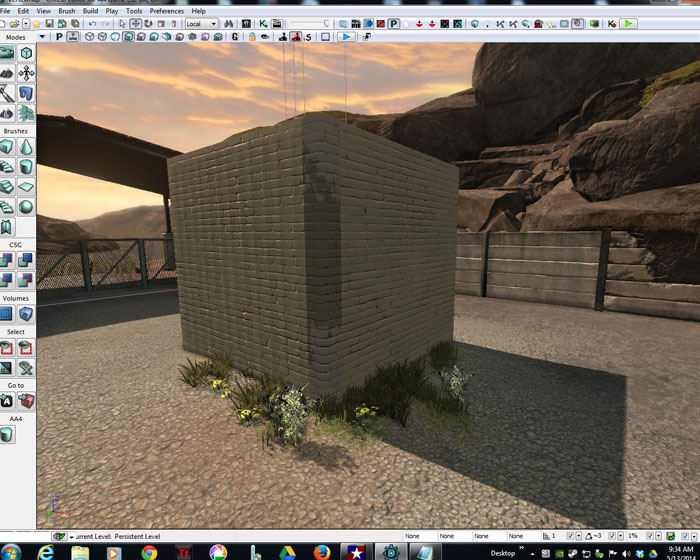
For this tutorial lets place wall asset Flat01_JS_SMesh and asset Flat01_Col_SMesh onto your map.Duplicate the wall and align it on other side of the corner asset
ModKit_Walls_03
The materials used are from package Surface_Walls_brick."MaterialInstanceConstants"
Make sure you fully load each of these packages.
Lets get started...
For this tutorial lets place wall asset Flat01_JS_SMesh and asset Flat01_Col_SMesh onto your map.Duplicate the wall and align it on other side of the corner asset
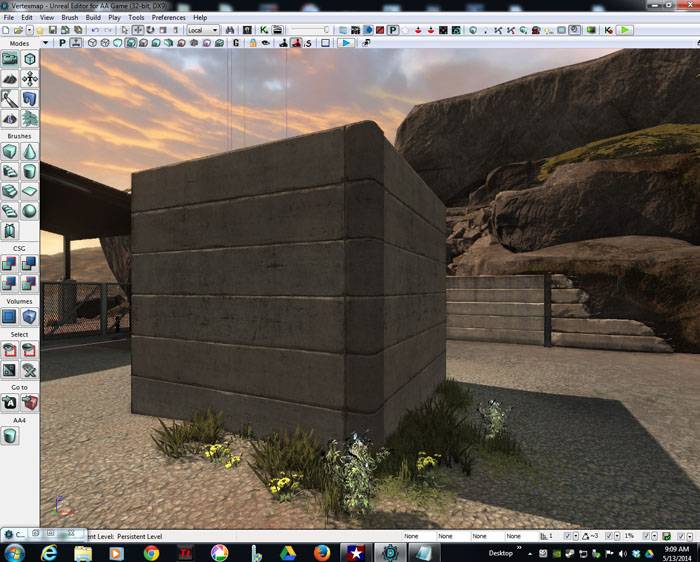
You will notice the Flat01 wall mesh has 2 different materials applied to it..This means this mesh has 2 material slots.So we can have a interior and exterior material applied.
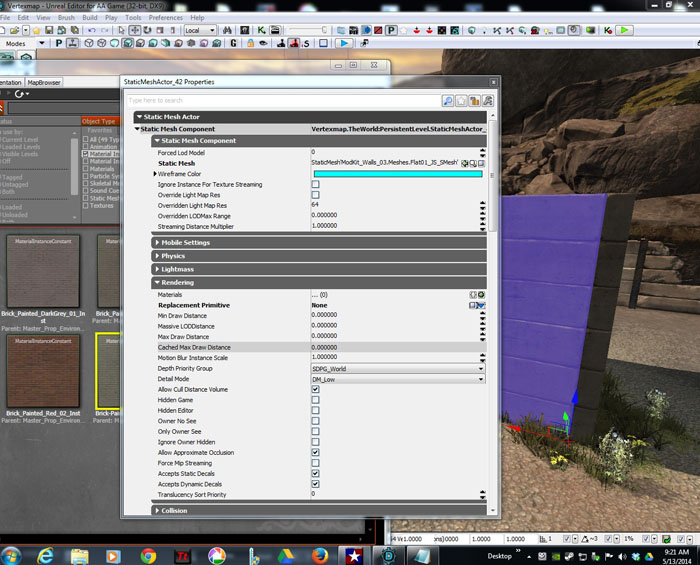
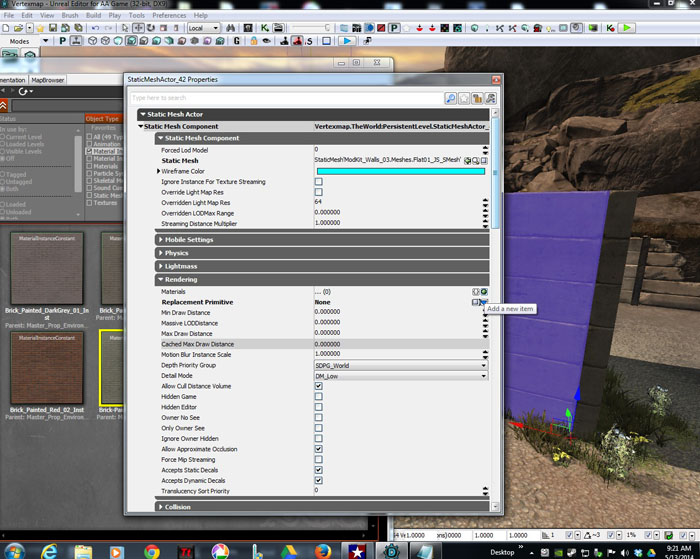
Select FLat01_JS_SMesh and Press f4 to bring up its properties.
Under the Render section "Materials"
Click the green cross twice"Add new Item" this will add two material slot to the asset.
Select FLat01_JS_SMesh and Press f4 to bring up its properties.
Under the Render section "Materials"
Click the green cross twice"Add new Item" this will add two material slot to the asset.
once done it should look like this
Make sure the walls properties window is open
Open content browser and go to the Surface_Walls_brick_package.Select any of these MaterialInstanceConstants for this tutorial I used Brick-Painted_NK_instance.
Open content browser and go to the Surface_Walls_brick_package.Select any of these MaterialInstanceConstants for this tutorial I used Brick-Painted_NK_instance.
While the material is selected click the green arrow in material slot 1"Use Selected Object in Content Browser"
Lets also do this for Flat01_Col_SMesh.You will notice this asset already has a slot applied lets make sure the surface material is selected and then click the green arrow.Now it has the brick material applied to it.
Once done lets close the content browser for now and the assets properties window..
You will now see the asset has your selected material on the exterior of the wall.
"Ive gone ahead and added the same material to the other wall."
So now it all looks like this.
Ok now we are ready to modify the look of the wall..
Lets get painting..
Select the Mesh paint mode tool located above the Landscape icon left side top section.
once you select it you will see the paint palette"tool" on your screen.
Lets get painting..
Select the Mesh paint mode tool located above the Landscape icon left side top section.
once you select it you will see the paint palette"tool" on your screen.
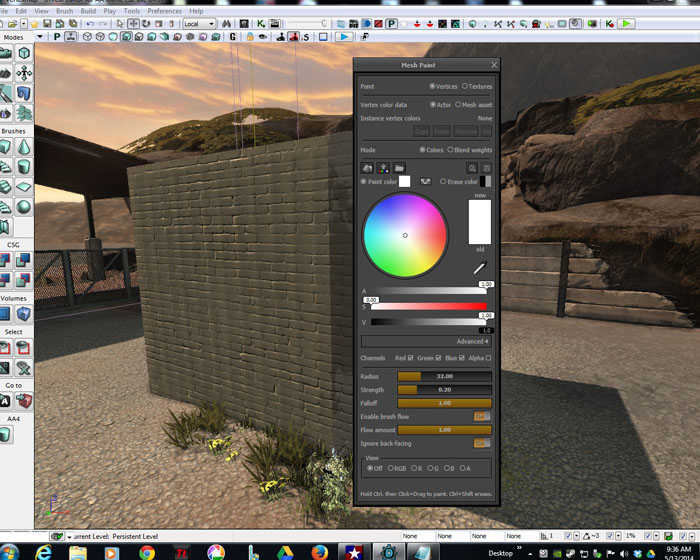
For this tutorial I wont run through all the properties..We just want to paint something..
Select the first wall.Now you will notice a circle with some dots.The circle represents the distance we will be painting the dots the vertices of the mesh.
Firstly lets get a nice falloff on the brush.
In the palette you will see
Radius
Strength
Falloff
The radius well you know what that does..
Strength this will apply the amount of depth of the material your painting..The stronger the value the stronger the material.
Fall off this is for make a nice fade of the material being applied.
For this tutorial I wont use the R,G,B channel,You can deselect the G,B channel and use R or depending on material set up use G or B
Leave the radius at default
Leave Strength at default
Make the Falloff 0.55
Now in the color section you will see 3 color strips
A,
S,
V,
When left at default you wont see any changes when you paint..
But if we slide the V value down to 0.34 and start painting you will see the Vertex Shader at work.
Do this by Holding down control and left click to start painting.
Do this to both walls and the corner mesh.
NOTE"the corner mesh had a slight variant and didn't paint well"
But that's ok.
That's the basics of painting with a Vertex Shader , once the material is applied to the mesh you can achieve some great looks.
Here is the final result
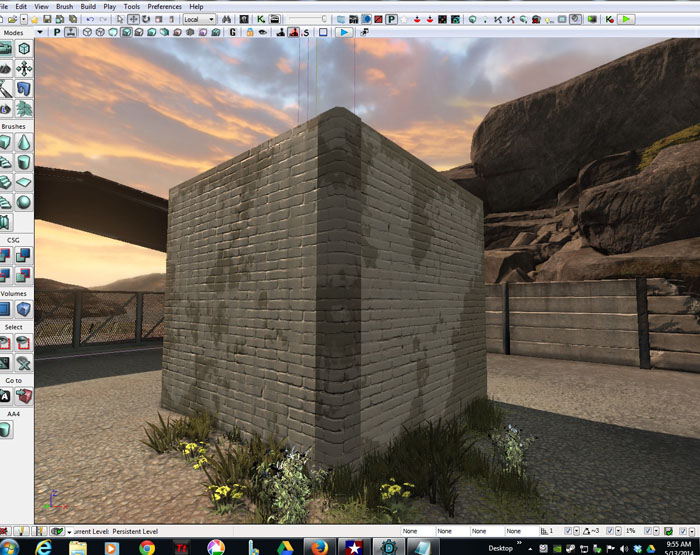
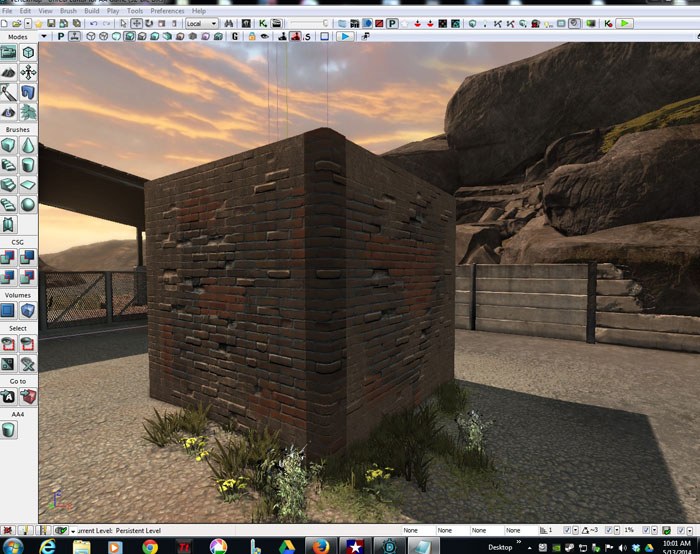
Here are some other variations.
First image I used
Brick_painted_Red_02_Inst
First image I used
Brick_painted_Red_02_Inst
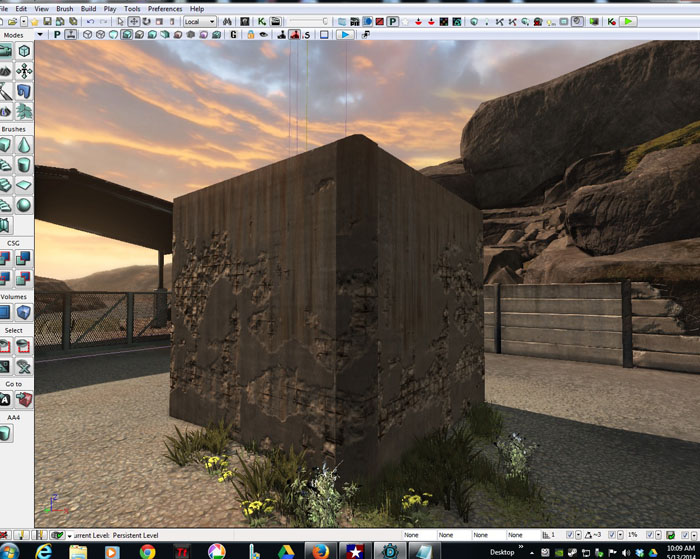
Second image I used the material
Concrete_Damaged_02_JAS_1_NST from package Surfaces_concrete
Concrete_Damaged_02_JAS_1_NST from package Surfaces_concrete
I hope this little tutorial helps some of you with vertex painting.
There are also a lot of tutorials on youtube.
Just type UDK vertex painting.
Now get painting
There are also a lot of tutorials on youtube.
Just type UDK vertex painting.
Now get painting
Cover Links
AA CoverLinks
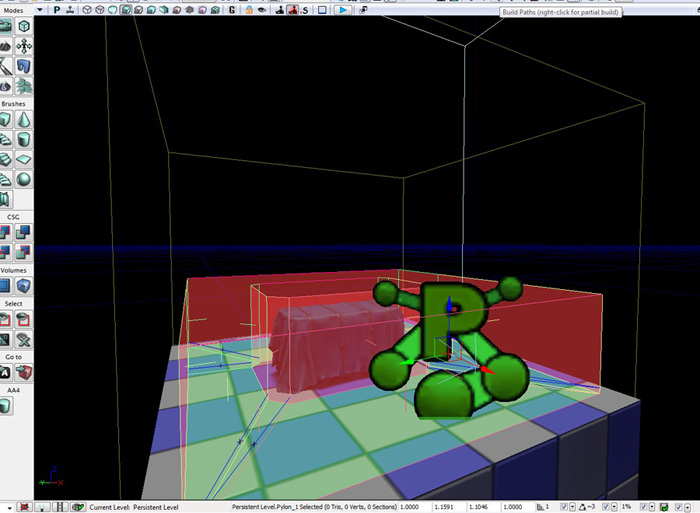
1.Placing a pylon into your map
Right click in your map go add actor add PYLON.
1.Placing a pylon into your map
Right click in your map go add actor add PYLON.
Once pylon is added,click on Build paths..
2.Once this is done your pathways are built within the pylons volume size,to see your paths click on the viewport options icon ,first icon in any viewport
then click show then click on Paths..
You can now see your paths.
2.Once this is done your pathways are built within the pylons volume size,to see your paths click on the viewport options icon ,first icon in any viewport
then click show then click on Paths..
You can now see your paths.
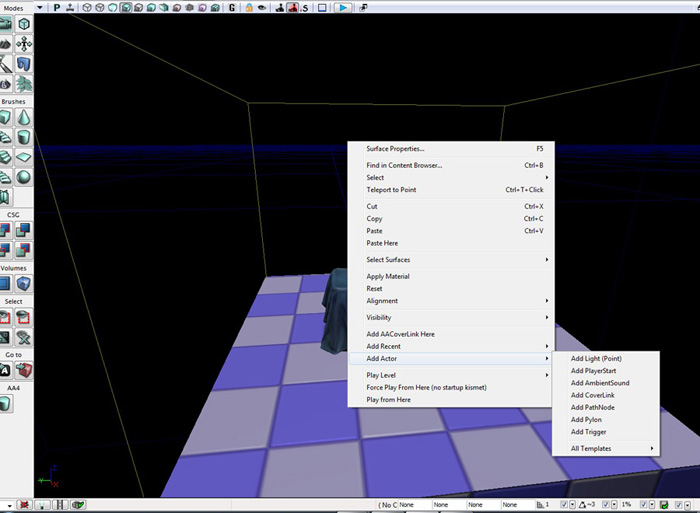
3.Lets add a AAcoverlink
Click View-Browser Window-Actor classes
In Actor classes type AAcover in search filter.
Now select the AAcoverLink and close the window.
Right click and Add AAcoverLink to your map.
Click View-Browser Window-Actor classes
In Actor classes type AAcover in search filter.
Now select the AAcoverLink and close the window.
Right click and Add AAcoverLink to your map.
Place the cover link where you want it, make sure X "Red Arrow of your widget" is facing the asset you want too use as cover
Now select the red cover fire link node.Hold Alt and drag to duplicate it.
Now you have 2 cover nodes side by side.
click on Build paths...
Now select the red cover fire link node.Hold Alt and drag to duplicate it.
Now you have 2 cover nodes side by side.
click on Build paths...
You now have very basic working cover
4.Now select the AACoverlink icon..""The man in the target icon""
Press f4 to bring up its properties.
You will see a lot of options..
4.Now select the AACoverlink icon..""The man in the target icon""
Press f4 to bring up its properties.
You will see a lot of options..

Lets change options in Slot 0
First off lets change.
Cover Type -For this tutorial I used CT_MidLevel
Location Description- CoverDesc_BehindBarrier
You can add many diff types of cover options to your AACover link..
I generally use.
Lean Left
Lean right
Can pop up
Can Mantle
Allow pop up
Allow Mantle
Enabled
Player Only
Now change Slot 1
to be the same as above
Once done rebuild your paths, save your map and test your AWESOME AACoverlinks..
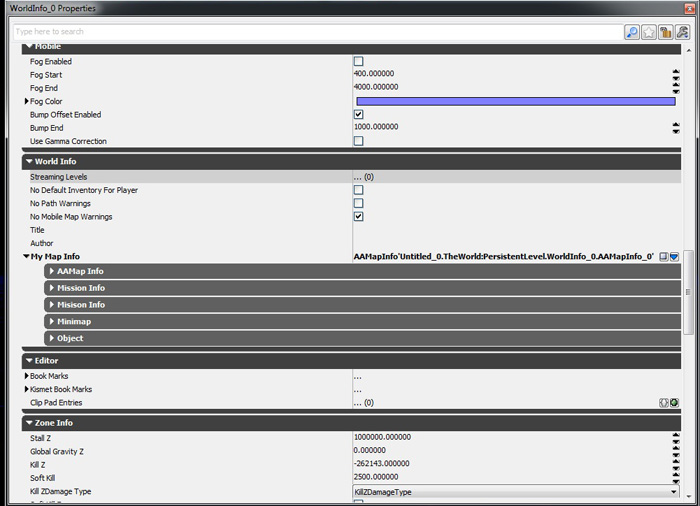
AAPG World info
World info is very important having the correct World Info makes it easy to cross between with both basic and advanced editor and publishing your map.
To set up your World Info.
Click View-World Info.
Once open scroll down to Mission info.
If you are starting off in a blank map you will have to create the Mission info by going to MyMapinfo and you will see a little blue icon,click this and it will show you 2 options AAMapInfo or AAShootHouseMapInfo.
For this tutorial we are selecting AAMapInfo.
Once you select this a new properties section will be created this is where you store your maps information.
AAMapinfo.Is self explanatory..
If its a night map or sewer map you would select the NVG"NightVisionGoggles"
AAMapinfo.Is self explanatory..
If its a night map or sewer map you would select the NVG"NightVisionGoggles"
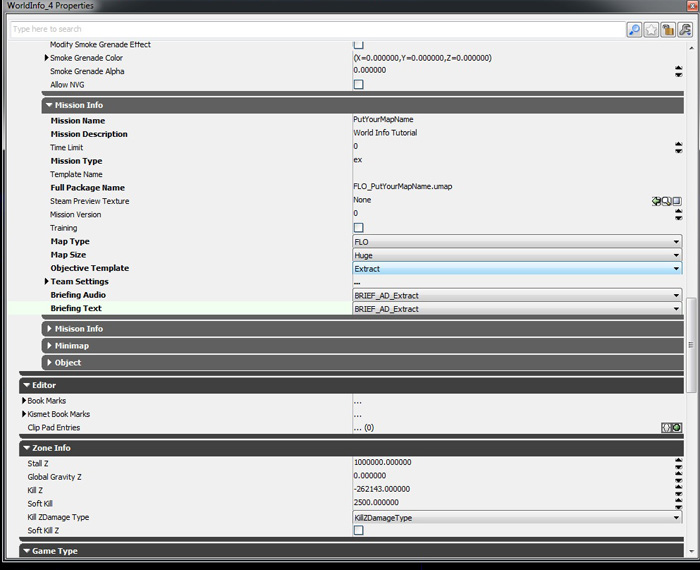
MissionInfo
This is your Mission information.
MissionName YourMapname "PutYourMapName"
Mission Description What your Mission is about Tutorial"
TimeLimit leave at 0
MissionType This is for the objective type for this tut lets do ex
TemplateName Since we used a Blank map leave this empty.If you used a Template it should be shown here.Example FLO_Huge_ex
FullPackageName This is the name the engine reads FLO_PutYourMapName.umap
SteamPreviewTexture The engine automatically adds this.
MissionVersion 0
Training leave Blank unless its a ShootHouseMap
MapType The type of Insertion points "amount of players" FLO 12 Players or BDX 6 players
MapSize Even though we used a Blank map.I will make it Huge
Objective Template We put ex in Mission type above so its Extract..choose any objective you want but make sure MissionType is the same.
TeamSettings Here's a fun one..You can leave this or if you want
Click on Team settings to open it up.
Change team 0 and Team 1 options.
Briefing Audio Since its a extraction map I choose BRIEF_AD_Extract
Briefing Text Since its a extraction map I choose BRIEF_AD_Extract
Now your WorldInfo should look something like this.
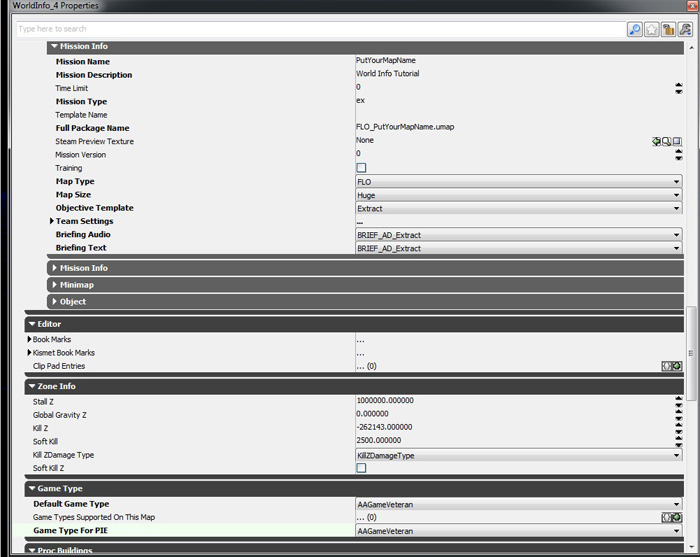
We are nearly done..
Scroll down and look for
GameType in here we want to change 2 options
Default Game Type AAGameVeteran
Game Type For PIE AAGameVeteran
That's it, close the property window and save your map.
Awesome job you now have a good Worldinfo..
Scroll down and look for
GameType in here we want to change 2 options
Default Game Type AAGameVeteran
Game Type For PIE AAGameVeteran
That's it, close the property window and save your map.
Awesome job you now have a good Worldinfo..
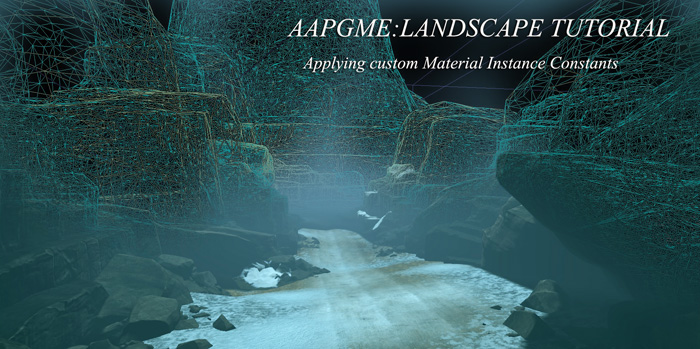
AAPG Applying Custom Material Instance Constants
Download this package.
http://www.mediafire.com/download/c96zn ... rctics.rar
This package contains
DT_ArcticSnows package.
-Textures
-Materials
-Decals
-Map file
"Feel free to use any of these or rip them apart to learn from"
Place the DT_Arctics folder in the Content Folder of Americas Army Proving Grounds
Location
C:\Program Files (x86)\Steam\steamapps\common\America's Army\AAPG\AAGame\CookedPC
Place the Landscape Tutorial Map Folder.
In the Maps folder of Americas Army Proving Grounds
Location
C:\Program Files (x86)\Steam\steamapps\common\America's Army\AAPG\AAGame\CookedPC\Maps
LETS GET STARTED
Create a blank map.
Select the Landscape icon tool.
The landscape tool palette will now be on your screen
Now lets create your heightmap.
In heightmap size.
Type in your Size Vertices..
Here is link that shows all sizes you could try
"or play around and create a custom set of values for your map"
http://udn.epicgames.com/Three/LandscapeCreating.html
My Tutorial example I will use these values.
type in
255x255
127
4
Now click Create Heightmap.
Our basic Heightmap is now created...close the Landscape tools.
Click on the binoculars and in search filter you will see a small list double click on your Landscape and close the search window
You will now see the landscape icon is highlighted press F4 to open our landscapes properties.
Lets leave this open and lets now open the content browser View-Content Browser
In packages search filter either type
Landscape which bring up all the packages containing anything to do with Landscape.
ME_Landscape is the DEvs package
or if you have my arctic package type
DT_ArcticSnows
Once you find the package right click on it and fully laod the package..
For this tutorial I'm using DT_ArcticSnows.
Click on the Materials group of the package..at this stage you will only see the Master material.
We need a Material instant constant"MIC".so go up to Object Type filters of the content browser and check the box next to
Material Instances Constants
You will now see the material instanceConstants"MIC" in the Material group.Select this.
now click on the Landscape properties window that should still be open and click the Green arrow in the Landscape section..
Landscape Material.
Your MIC will now be applied.
You can now close the landscape properties window,
You will notice our material MIC is applied but its all black,,Don't fear we are doing well.
You can now close the landscape properties window,
You will notice our material MIC is applied but its all black,,Don't fear we are doing well.
Now lets set up our dom light and lightmnass.
Right click on the landscape and Add Actor-Add Light - DominatDirectional Light.
Next select your red builder brush once selected make sure your in top view viewport '"T"
Click the Non Uniform scaling mode.and scale the brush so it completely covers the area of landscape you will be painting,
With the builder brush selected click on the volumes icon and click on LightMass Importance Volume.Drag your redbuilder brush away and you will see a Yellow volume surrounding your map...Thats your Lightmass importance volume...
Great thats all done....
Now lets add layers to your landscape..
If you chose the Arctic Snows"Arctic_Landscape"
Here are the list of landscape layer names in the Arctic_landscape MIC
-Mud
-DarkMud
-MuddySnow
-DirtySnow01
-DirtySnow02
-PowderSnow
-SoftSnow
-OldRoadX
-OldRoadY
-SnowTyreTracks
CanadianGrass
CanadianSnowGrass
Now click on the landscape tool and in the TARGET LAYER SECTION click Edit
Under Heightmap you will see
ADD NEW LAYER
layer name
so type in Mud and click the plus symbol
"This is our Base layer"And should always be the base layer with this MIC
Now lets add another layer Name
DarkMud and click the plus symbol
Do this 4 times
Ive added
Mud
DarkMud
DirtSnow01
DirtySnow02
SnowTyreTracks
Once your layers are added.
It should look like this
Select the Mud layer and make sure the Paint brush in "paint tools" is selected
Hold down control and paint on your first layer.
Slowly Paint the area you want.I generally paint the whole landscape.
Once done Save your map..
Now lets Select our second Layer to paint
DarkMud
Before we paint lets change the brush size to 135 and the fall off to 0.60
Now hold control and paint the second layer Once your happy with it lets paint another layer..Choose whatever you like..I chose DirtySnow02 and adjusted my brush size to 52 and the fall off 0.49
then SnowTyreTracks..Once happy .Right click and play from here.
If you notice your materials are slightly to big or even to small don't worry lets fix this..
Go to package
AA4_NME_inf_01 and select CZ_Inf Skeletalmesh"Soldier"
Add this character to your map..This is our scale reference for our materials.
Go to your Arctic package choose the MIC you applied to your landscape and open it up"double click".
Under Parameter groups look for the material you want to scale..For me I wanted to scale the SnowTyreTracks.
Click on the Black arrow next to the name to open its values..
The defaults are set to 1..
So lets make both R and G values 0.8..
Now our tyre tracks are a little bigger and look great..
Using the Parameter groups you change the values of any material in the MIC..
So play around with these until you get the look you want...
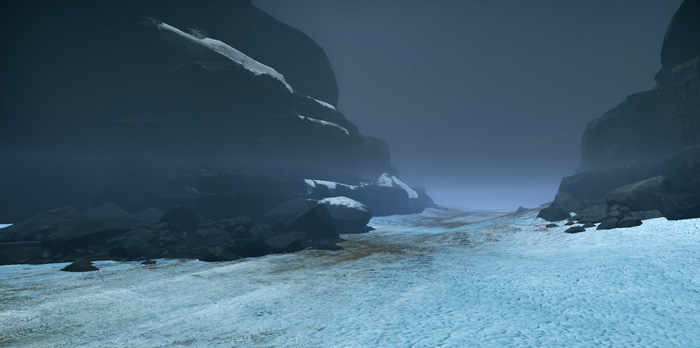
This is the result I got.
Hold down control and paint on your first layer.
Slowly Paint the area you want.I generally paint the whole landscape.
Once done Save your map..
Now lets Select our second Layer to paint
DarkMud
Before we paint lets change the brush size to 135 and the fall off to 0.60
Now hold control and paint the second layer Once your happy with it lets paint another layer..Choose whatever you like..I chose DirtySnow02 and adjusted my brush size to 52 and the fall off 0.49
then SnowTyreTracks..Once happy .Right click and play from here.
If you notice your materials are slightly to big or even to small don't worry lets fix this..
Go to package
AA4_NME_inf_01 and select CZ_Inf Skeletalmesh"Soldier"
Add this character to your map..This is our scale reference for our materials.
Go to your Arctic package choose the MIC you applied to your landscape and open it up"double click".
Under Parameter groups look for the material you want to scale..For me I wanted to scale the SnowTyreTracks.
Click on the Black arrow next to the name to open its values..
The defaults are set to 1..
So lets make both R and G values 0.8..
Now our tyre tracks are a little bigger and look great..
Using the Parameter groups you change the values of any material in the MIC..
So play around with these until you get the look you want...
This is the result I got.
Now lets just manipulate the geo of our landscape a little..And add some assets.
For this tutorial I chose.
Rocks_Rubble_dirt_02_MZSMesh
In package
Props RockPiles_01
Cliff_ProtoTypeA_JAS_SMesh,Cliff_Rock_01
Located in Props_Rocks_01
And Mountain_Rock_CMZ_01
Located in package
Props_Mountain.
I also added a post process volume to get the look I wanted and a slight DOF"Depth of Field"
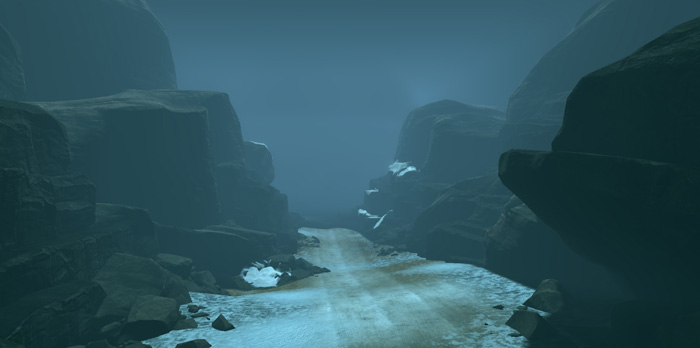
The end result of my Landscape basics of using Custom Landscape MICS looked like this.
For this tutorial I chose.
Rocks_Rubble_dirt_02_MZSMesh
In package
Props RockPiles_01
Cliff_ProtoTypeA_JAS_SMesh,Cliff_Rock_01
Located in Props_Rocks_01
And Mountain_Rock_CMZ_01
Located in package
Props_Mountain.
I also added a post process volume to get the look I wanted and a slight DOF"Depth of Field"
The end result of my Landscape basics of using Custom Landscape MICS looked like this.
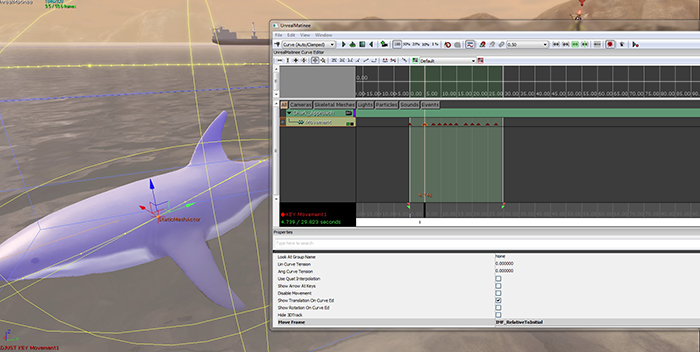
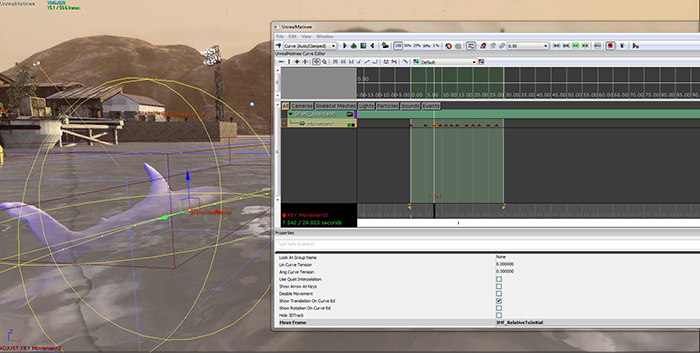
Basic Movement Tracks
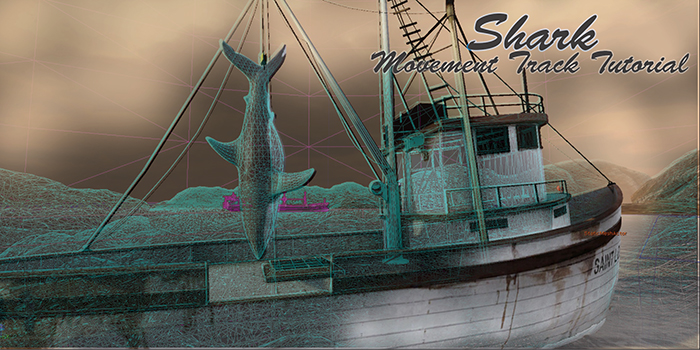
Shark Movement track rotational matinee.
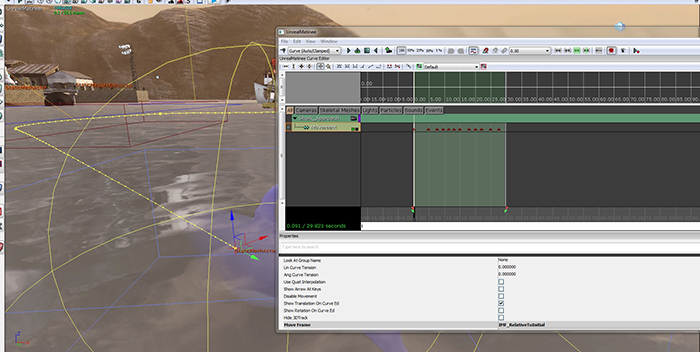
Once you set up your matinee and add a movement track , set the time scale to something like 30 seconds."now this depends on how long the circular movement track will be..Mine is based off a shark swimming around a boat or in a small bay.
If your intending on doing one around a island I would set the time scale to something like 120 seconds or 3 minutes or even more .
Once this is done.You want to start setting up key frames..
Step one
Grab the black Movement track slider and slide it up to the 10 second mark and leave it.
Make sure your shark interp actor is selected and move him to a appropriate distance once happy add your first key by clicking "add key" or press Enter.
Now you have your first part of your movement track set up.
Next grab the black Movement track slider and move it to the 20 second mark and leave it..
Select your shark and change your widget to rotation and slightly rotate your shark and move the shark to a appropriate position once happy select"Add key" to add another key frame.
Continue to do this until your shark ends up at your first initial key frame.Hopefully creating a full circular movement track..
Once done your Movement track should look something like this..
Now you can select and key frame and change its position.
Keep adjusting your movements and rotations of your shark until you get your awesome track finished..
This is a quick tutorial,Showing the very basics of a simple movement track.
If you have any issues please email me
If you have any issues please email me
Publishing a map in AAPG "basic version"
Lets get started
Before we publish your map make sure your World info is correct.
please read my tutorial on World info.
Once your World info is correct.
You should rebuild your map.
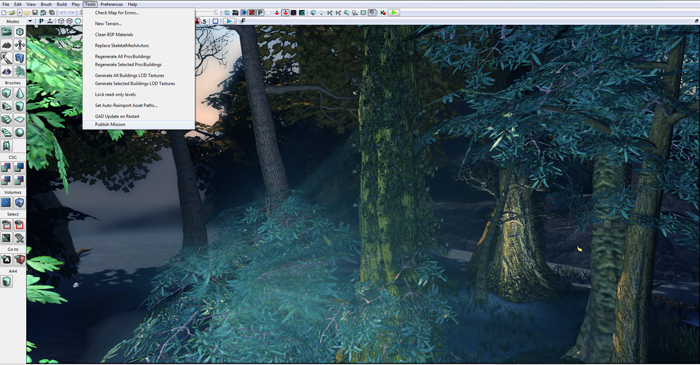
Now its time to publish
Click on tools-Publish
Before we publish your map make sure your World info is correct.
please read my tutorial on World info.
Once your World info is correct.
You should rebuild your map.
Now its time to publish
Click on tools-Publish
A publish window will appear ..
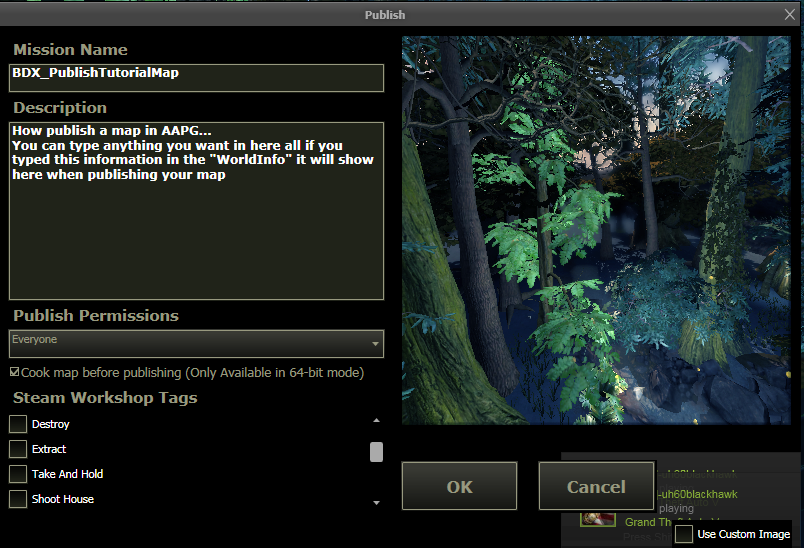
This has all the information about your map.
Mission Name
Description
Publish Permissions
objectives
Team size
Creators progression
Mission Name
Description
Publish Permissions
objectives
Team size
Creators progression
---------------------------
Publish Permissions
Publish Permission Properties:
Everyone (make sure this is set to everyone if you want any public player to Download your map
----------------------------
Cook: (check this box if you have custom assets in your map)
---------------------------
OBJECTIVES
Depending on your objective set up
This should be automatically selected on your objective type if not select it.
If you have a custom set up select the one that is most important to your objective.
Activate
c4
Destroy
Extract
Take and Hold
Shoothouse
____________
Team SIze
BDX_FLO
These 2 represent how many players can be on your map for either team
BDX(6v6)
FLO(12v12)
________________________
Creators Progression
These 3 options are fairly straight forward
Alpha: is basically used to see if your map publishes correctly
Beta: is for first time setting on server tests
Final: well its the final version of your awesome map
Alpha
Beta
Final
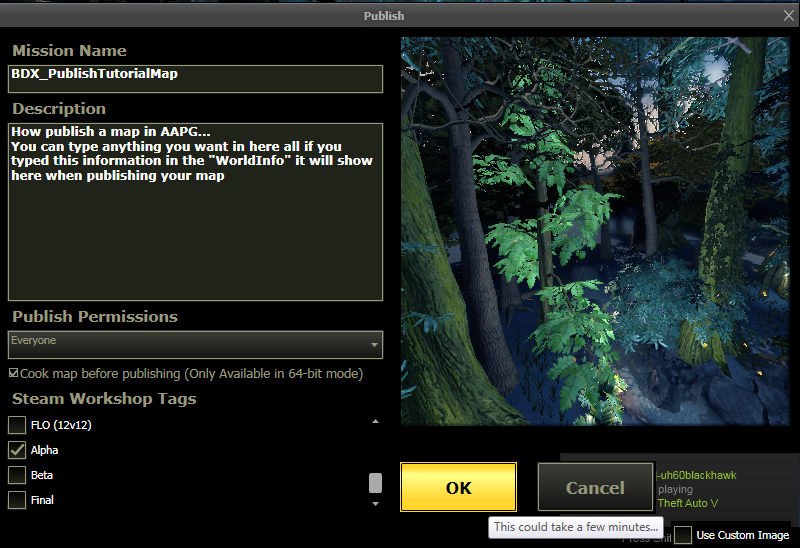
Once you have set your maps publishing properties correctly its time to click
OK
"this should take a few minutes"
Publish Permissions
Publish Permission Properties:
Everyone (make sure this is set to everyone if you want any public player to Download your map
----------------------------
Cook: (check this box if you have custom assets in your map)
---------------------------
OBJECTIVES
Depending on your objective set up
This should be automatically selected on your objective type if not select it.
If you have a custom set up select the one that is most important to your objective.
Activate
c4
Destroy
Extract
Take and Hold
Shoothouse
____________
Team SIze
BDX_FLO
These 2 represent how many players can be on your map for either team
BDX(6v6)
FLO(12v12)
________________________
Creators Progression
These 3 options are fairly straight forward
Alpha: is basically used to see if your map publishes correctly
Beta: is for first time setting on server tests
Final: well its the final version of your awesome map
Alpha
Beta
Final
Once you have set your maps publishing properties correctly its time to click
OK
"this should take a few minutes"
Your map should now be publishing
Sharing file
Sharing file
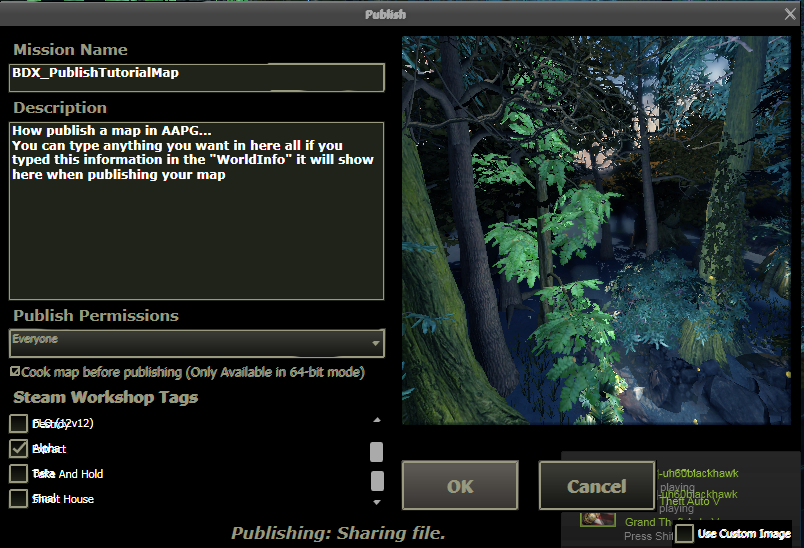
This might take a few minutes depending on size of your map and if it has cook checked for custom assets.
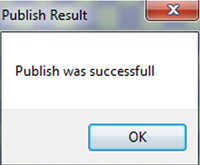
Once completed you will get a small window
Publishing was successful
Once completed you will get a small window
Publishing was successful